This year's costumes were inspired by Hannah's notion of becoming a windsock. I decided to be a runway, which evolved into an airport after I added the control tower hat. These costumes ended up really sweet, and a nice pairing.
Hannah in all her windsock glory. There is a stick that can be used to simulate wind!
Ready to hit the streets.
Here I am with Phil
Us at Plonk.
Close ups of the tower. I like some of these little guys a lot more than others, but this is a pretty crazy control tower, not a very safe airport. At least it has a radar...
20051030
"Artificial" Tree
Last week the neighbors out our bedroom window jerkily cut down the tree that provided both privacy for our window and a staging area for birds coming in to land at the window feeder. This assassination is part of the "renovations" of the house (which they bought and have yet to live in). Not only did they cut down the tree, but they added an addition, so we went from nice tree, with trees behind to no tree with a stark wall. Thanks guys. To recover from this situation, we trolled the neighborhood for fall cuttings, and attached them to the shelf bracket holding up the feeders. Happily, we get a little shielding and the birds are coming back to the feeders again.
I don't have any "before" pictures, but the improvement is substantial. Plus, we got to use this crabapple branch and other good ones, picking out favorites from the piles.
I highly recommend this technique for any dwellers who need to being a little nature to their window. It is especially nice paired with the feeder because the birds clearly prefer a feeder with a staging area where they can land, plus it provides cover which they like. The implementation is just a shelf bracket with a metal piece attached across the end to hand the feeders, and then a bunch of branches bound to the bracket by twisting pieces of 20 gauge wire.
Posted by
Joe Heart
20051018
Starlit Shelving
In our tiny apartment, there is no room next to our bed (squeezed between a wall and a door) for a night stand, so Hannah proposed to build a shelf over the bed, high enough to reach while sitting, but with enough room to fit underneath. I proposed we make it out of peg board and stick a bunch of white Christmas lights in it to gussy it up. It turned out great, and we built it in a fun weekend.
We went to home depot, bought a $12 4x8 sheet of peg board, and three 8 foot 2x2s. We have no shop, so the guy at the D cut two 4x1 foot pieces off one end of the pegboard, then two 6x1 pieces the other way, and finally, the last piece into a pair of 2x3 footers to actually use as peg board behind project tables (not exactly any craftmanship there, but it gets the job done) I also had the 2x2s cut into a pair of 6 footers (should have been 59.5 inches to match the peg board after saw kerf ) and a pair of 4 footers. The 2x2s were just over $2 each. Add four $1 L brackets , a small box of your favorite wood screw size ($5) with optional washers($2), and $4 for 200 Christmas lights. All this makes a 4 foot shelf and a 6 foot shelf which fit really nicely over a queen sized bed in a corner. Lastly, mix in beer and peanutbutter cups and presto, a new shelf for under $40!
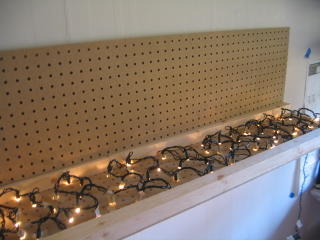
They worked out cooler than anticipated. These shelved would really benefit from being cantilevered from above, or from a little extra investment in nicer L brackets. When we move I'll try to reinstall them hung out from stuf mounted cables instead. Also, we used masking tape to hold down the lights until we could finish the whole sandwich, but I think there are better tapes for the job.
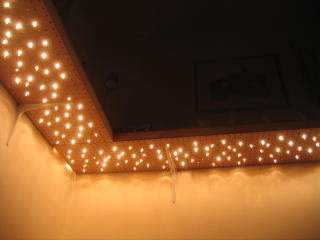
They feel a lot like we built a fort, which is good, and generally feel pretty magical.
Posted by
Joe Heart
Subscribe to:
Posts (Atom)