The hardest to make so far on the NES coffee table has been the D-pad.
Because it's multi directional, it can't just be a straight push button like the others, this brings up a few complications, mainly with friction and bits rubbing together.
To actually model the D-pad, I started by cutting out the pattern on the top in some of the 4mm MDF, again using a blunt graphics scalpel (I really should have invested in a good Stanley knife or something).
I glued it onto a cross I cut out of the 18mm MDF.
Then took to it with some sanding paper and gap filler to give it a nice curved look to it.
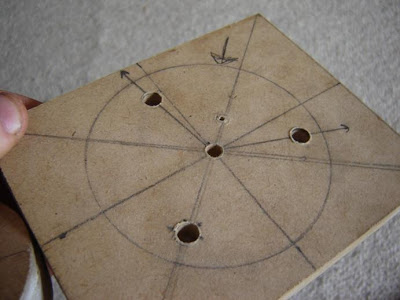
As I mentioned, actually making it work was the difficult part. I started off just like the other buttons, with one bolt on each arm, a spring on each bolt and a washer to act as stoppers for the springs.
For the backing plate I put a screw through the centre for it to rock on, and so opposite directions couldn't be pushed down simultaneously.
I also had to drill the holes a lot bigger to accommodate for the distance that the bolts will travel when they twist and rotate (that's why I needed the washers, because they would otherwise fall straight through these holes).
Here is the the prototype I made before making the actual button.
It is able to rock from side to side, up and down, and diagonally as well. It also seems to be very sturdy and ready to take a beating.
This is the final button, constructed.
Next step for me to do is to mount the buttons in the lid of the coffee table and make sure they don't rub or catch on anything.
20080330
NES coffee table update 2: Making the buttons.
With the main part of my NES controller coffee table basically constructed, I was finally able to find the right sized hole-saw in my dads garage (it's basically impossible to find anything in there, seriously look at how much of a mess it is in the background of some of those pictures in the previous posts), it was time to make the A and B buttons.
I don't know whether I mentioned earlier, but besides just asthetically looking like a NES controller, I also wanted the buttons on it to work (and when not being played a large piece of glass sits on top of it so it can be used like a regular coffee table; to place stuff on).
They key to making the buttons for this was sturdiness. I've got some pretty retarded friend who are probably ready to go to town on this thing, so it needs to be able to stand up to a good beating as well as remaining easily playable.
Above is my fantastic 5 second sketch of how the buttons might be constructed.
After cutting the buttons roughly, and cutting a backing plate for them, I drilled 3 holes through the plate and half way into the buttons, I then got 3 quarter inch bolts per button, cut the heads off them and hammered them into the button.
I also bought a few small springs to go over the bolts like so.
Next up was to drill the holes in the backing plate a bit larger so there is minimal friction between the bolts and the plate while still guiding the button properly.
The button is positioned through the backing plat and nuts are put on the bolts to stop the button from coming out.
And there you have it, one sturdy, working NES button.
After if figured out the proper mounting, I will probably use just some big strips of copper as the contact points for the button. Otherwise, maybe buy some push buttons from dick smith and mount them in there.
In the next post; how I constructed the D-pad (that was a whole lot harder to do because it has to rock in all directions).
Posted by
Joe Heart
NES coffee table update 1: Bevelling the edges
Being a future 3D modeller (hopefully, oh btw I'll probably do some posts of some 3D projects in the future, at the moment I'm modelling an Enzo Ferrari, you can see I used the half finished model in that motion tracking test three posts ago) I love all my edges bevelled.
And I also wanted to bevel the edges of my giant NES controller approximately to scale to how the actual controller is rounded.
After finishing the bottom half of the coffee table/ storage box, it was time to start polishing up the shape.
To bevel the top edge I just got a 5mm radius (I think approx.) curved router bit and ran it along them, but the vertical edges needed a larger radius curve. I needed to use a plane and some sandpaper.
To make sure I'm curving it straight, I drew two lines about a cm or something back from the edge.
This acts like a guide so I know I'm going even and not curving it more to one side.
Here is what it looked like after I finished planing it, not too hot, it might have been better if I had a less blunt/rusty plane.
But not to worry, a bit of sand paper will even that up;
Bam. There you've got yourself a nice straight bevelled edge.
Here's what the box looks like, after I bevelled the edges, on its side.....
And here's what it looks like the right way up... Awesome.
Posted by
Joe Heart
20080329
NES coffee table!
The last few posts I made have displayed some of the older videogame-related projects that I have worked on in the past, now it's time to show off my current project!
Since building my Asteroids arcade cabinet replica/ television cabinet, My videogame collection has grown almost double the size, I've completely filled the storage space in the cabinet and now there are boxes, consoles and loose carts all over the floor.
A few weeks ago I decided it was about time I made myself some more storage space, and so I began to make this.....
Golly gosh! What could this possibly be!?....
Wait a second! I recognise those shapes! That's a ginourmous fucking NES controller!
(this is what my hands looked like after cutting out the above pieces, basically I had to cut those pieces out of a big piece of 4mm MDF. The only cutting utensil I had at hand was a half blunt graphics scalpel....)
I saw the giant NES controller they made on G4TV and one thing that I thought looked kind stupid was how the surface was perfectly flat and the edges were perfectly sharp (not bevelled), so with this I decided to use some 4mm MDF as a second layer to raise the bits where the plastic stands out, in the next post I'll show how I bevelled the edges to scale.
Here are the button holes after I cut them out, I used a drill and a jigsaw to cut the D-pad holes and a 90mm hole-saw for the A and B buttons, and a spade bit and the jigsaw for start and select.
Here's the top part of the coffee table being glued and clamped together, I didn't want to use screws or nails because I plan to bevel the edged where the screws would obtrude.
And there you go! phase 1 of the NES coffee table/storage box complete, next up; bevelling the edges so they don't look sucky. Awesome.
Posted by
Joe Heart
20080328
Asteroids arcade cabinet
Okay, here's a big one. This is a project I had been working on for about half a year back in 2006.
At about this time my videogame collection was starting to get kind of out-of-hand, I had about twenty something consoles at the time (now I'm up to 35 or so I think), and I had no place to store all my games and boxes and stuff.
The thought crossed my mind to create an arcade cabinet that could store my television and have storage space for all my games and boxes etc.
Initially my plan was to make a Donkey Kong or a centipede cabinet because I liked the sideart on those cabs, in the end I ended up deciding on Asteroids, I don't know why, I think I just liked the shape of that cabinet more.
Anyway, here is the final result (actually it's not finished, I've been meaning to buy some glass doors to put on the bottom front there.):
And here are the progress shots (I kind of wish I had taken more photos as I went, its pretty interesting to look back and see how you made stuff step by step):
Here is before it was painted, I wish I had taken more photos of how I actually built it.
Below is the shelf thing I made for inside the cabinet, it stores 64 carts, NES carts, megadrive carts, master system carts, CD cases , nes boxes, megadrive boxes, 2600 boxes, and DVD cases.
It also swings out to reveal a cavity behind it for storing spare controllers and consoles and console boxes.
Here is the progress painting it:
Here is how the shelf thing works, and you can see all the console boxes stacked tetris-style behind it:
SWING!
I've made sure to take a lot more photos on the progress for the current project I'm working on, so stay tuned, I'll probably do post on it as I go and how I've solve some of the problems the arise.
.....Awesome.
Posted by
Joe Heart
Maya Live motion tracking, holy crap awesome!
Yesterday morning I was browsing through the maya help files when I came across something interesting; Maya Live.
It's a basically a fairly-easy-to-get-the-hang-of 3D motion tracking plugin for Maya.
Why the fook isn't there more stuff on this on the internet!? No tutorials, barely any documentation.
Luckily the Maya help files are actually really useful in this instance.
Anyway, after only half an hour of fiddling around and some rough tracking, I was a able to produce this;
The model is just an unfinished enzo ferrari I've been modelling for a while (haven't had the chance to work on it in ages though), I'll post some finished renders when I'm done, no doubt motion tracked to some live background footage. Awesome.
Posted by
Joe Heart
Awesome Portable arcade controller
Okay this is my first real post, I can't decide how to start posting on here, so I might as well just jump straight into it. Hopefully in the future I will be posting a whole lot more projects like this, as well as well as some digital media projects like motion graphics and stuff.
Anyway, a while ago I discovered MAME, if you don't know what it is, check it out....now foo!
I got the sudden urge to create a more authentic arcade control scheme to play my favourite games on; the Metal Slug series.
At this time I was also in the process of building a replica Asteroids arcade cabinet (more on that in the next post!) so I had some leftover MDF.
Anyway after a bit of fiddling around with nails and glue, I ended up with this:
And some progress shots!:
This is before it was painted. Awesome.
Here are the innards of the sucker. I got one of the joysticks from the friendly maintainance guy at my local Playtime.
I ordered most of the buttons from this arcade distributor in Western Australia or something, they were pretty cheap. Awesome.
To get the controls to actually interface with my computer, I initially tried hacking an old keyboard I got off a friend, this worked pretty well, except the keyboard button matrix thing caused some annoying key lockout problems (where if you press certain keys simultaneously, they don't register).
A few weeks later however, I was walking past a Dodo store (remember them, they were the most pointless, useless stores evar.) And they just so happened to have these nice dual playstation controller USB things, where it plugs into 1 usb port on your computer, but it has two controllers connected to it.
I was able to rewire them with to the 9-pin ports so my arcade controller would plug into them, and it shows up as two generic 8button 4way controllers on the computer, so the buttons can be assigned easily for any MAME game.
I also rewired a NES controller, a SNES controller and a Megadrive controller so I can use them on emulators for games that are too hard to find in cart form (no I don't condone piracy).
Posted by
Joe Heart
Subscribe to:
Posts (Atom)