
I found a lot of information online about programming PIC microcontrollers under both Microsoft Windows and various types of Linux. However, the information relating directly to Mac OS X was quite sparse. I began by working with both Linux and Windows under VMWare Fusion, but eventually migrated to OS X when the overhead of continually running VMWare just for PIC stuff became too much.
In this blog post, I'll explain how I set up my toolchain under OS X. My setup is still in its infancy, but I thought I'd share the information early.
1. Obtain a programmer
The first step was to obtain the required hardware - a programming device that can upload your program to the microcontroller chip. There are various programming kits available online and from electronics stores, but to be safe, I ordered a PICkit 2 programmer directly from Microchip Inc. It connects to the computer via a standard USB cable: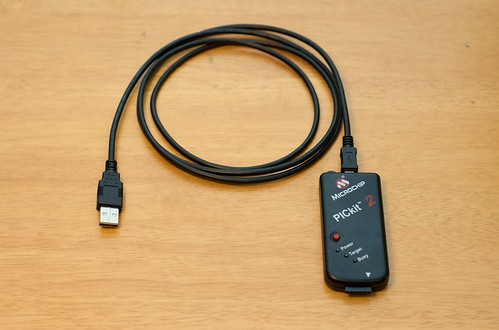 The PICkit 2 cost AU$54.70, which included shipping to Melbourne, Australia. It also came with a demo board, which included a PIC PIC16F887:
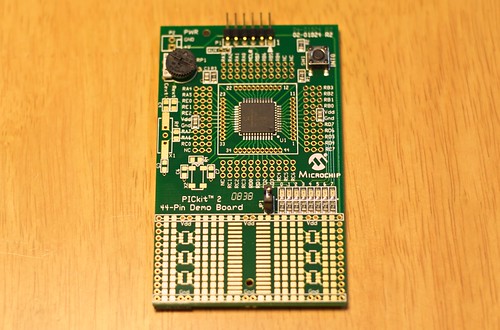 To get started, this was the only financial outlay (given that I already owned a modern Mac computer running OS X!).
2. Download and compile GPUTILS
GPUTILS provides programs to deal with compiling PIC assembly code. I usedgputils-0.13.7 and compiled it using the standard commands:
$ ./configure
$ make
$ sudo make install
3. Download and compile SDCC
The next stage was to obtain a compiler. The compiler takes human-readable programs and converts them to machine code. I wanted to use the C programming language for my work, so I began using the Small Device C Compiler (SDCC).I downloaded the source code for SDCC and compiled it using gcc. For this step, you need to have the OS X developer tools installed. I obtained SDCC from their subversion directory (read their documentation to learn about this), and then compiled it from the command line using the standard commands:
$ ./configure
$ make
$ sudo make install
4. Compile the SDCC PIC libraries
Inside the SDCC source directory, we now have to compile libraries for SDCC on the PIC16 architecture. This is done as follows:
$ cd device/lib/pic
$ ./configure
$ make
$ sudo make install
$ cd ../pic16
$ ./configure
$ make
$ sudo make install
$ cd ../
$ make
$ sudo make install
5. Download and compile PK2CMD
Microchip Inc. have provided source code for a program calledpk2cmd which can be compiled under OS X and Linux. This program communicates with the PICkit 2 programmer. The idea is that once your code has been compiled by SDCC, pk2cmd controls the PICkit 2 programmer to program the chip.I obtained the
pk2cmd source code from the Microchip website. The required package (at the time of writing) is listed about 3/4 of the way down the page and is called "PK2CMD V1.20 Linux & Mac OS X Source Code with Makefile". After extracting the package, I compiled it for OS X 10.5.7 and installed it as follows:
$ make mac105
$ sudo make install
Take note of the makefile target that had to be used for OS X 10.5 (
mac105). There is more information in the makefile included with pk2cmd.6. Try a test program
The final stage is to check that your toolchain is working. The simplest way to do that is to try out a test program with the 44-pin demo board that comes with the PICkit 2 programmer. The test program below works for me:With this code in a file called
test.c, it can be compiled and uploaded to the demo board as follows:
$ sdcc -mpic14 -p16f887 test.c
$ pk2cmd -B/usr/share/pk2 -P -T -M -Ftest.hex
If everything is successful, you should see the LEDs on the board winking from left to right.


